
Add a menu to WordPress page with PHP action hooks
Adding a menu to WordPress via PHP and action hooks requires three steps, registering the menu location, assigning a menu to it and then placing the menu with an action hook.
Register WordPress Menu
Registering a menu is done with register_nav_menu, below is an example to register a ‘Store Menu’ menu.
add_action( 'init', 'wpb_custom_new_menu' );
/**
 * Register New Store Menu
 */
function wpb_custom_new_menu() {
    register_nav_menu('store-menu',__( 'Store Menu' ));
}
Once it is registered it is visible in the WP dashboard, Appearance > Menus.
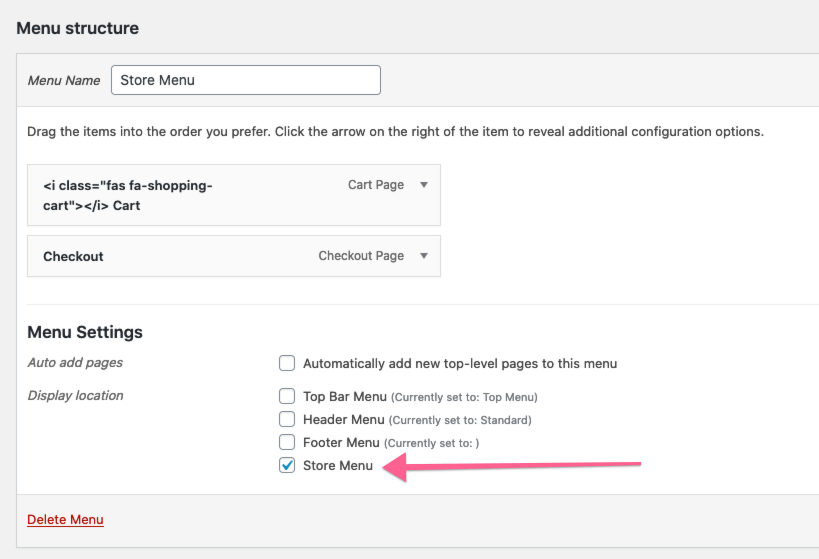
Assign WordPress Menu to new location
The next step is to create a menu and assign the new location to it, easy enough!
Position the Menu
So now you can position the menu using a number of hooks, a function and WordPress internal function wp_nav_menu
add_action( 'woocommerce_before_single_product', 'store_menu_placement' );
/**
 * Place New Store Menu
 */
function store_menu_placement() {

    wp_nav_menu( array(
        'theme_location' => 'store-menu',
        'container_class' => 'store-menu-class' ) );
}
So in my example I am placing this menu on single WooCommerce products just before the product details, I am using the theme location ‘store-menu’ as per the menu registration and including a CSS class in the containing element.
Adding some CSS
Finally you can add some CSS styles to get you up and running.
/* Store Menu */

.store-menu-class ul {
    margin:0 0px 20px 0px;
    list-style-type: none;
    list-style: none;
    list-style-image: none;
    text-align:right;
}
.store-menu-class li {
    padding: 0px 20px 0px 0px;
    display: inline;
}
.store-menu-class a {
    color:#27408f;
}

.store-menu-class a:hover {
    color:#428bca;
}

@media (min-width:1024px) {
	.store-menu-class {
		position: absolute;
		right: 0;
		top: 1px;
	}
}
Edit to suit your needs.


